Winter is here, and with it comes the need to get our homes ready for colder temperatures. One of the best ways to do this is by cutting wood for fireplaces and stoves. Cutting your own wood can be a daunting task if you don’t know what you’re doing – but fear not! In this article, we’ll provide tips on how to cut wood so that you can keep warm all winter long efficiently.
For many people, cutting their own wood provides a sense of satisfaction and accomplishment. Not only does it save money in the long run, but there’s something special about providing heat for yourself that makes us feel empowered. Having said that, however, it’s important to approach the task with caution – improper technique can lead to injuries or even property damage.
In this article by Justin from LogSplitBoss.com, explains that with some simple steps and taking precautions when necessary, anyone can become an expert at cutting wood for winter use. Read on to learn how you can achieve success during your next winter project!
Choosing The Right Tool
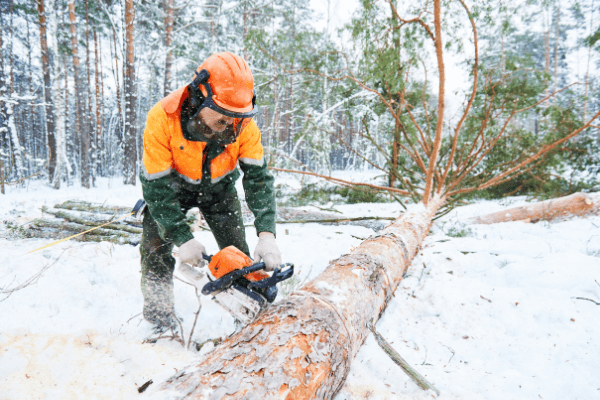
When it comes to cutting wood for winter, the right tool is essential. Whether you’re sawing a log in half or trimming branches from fallen trees, having a sharp blade and the correct equipment makes all the difference. To get started on your project quickly and safely, here are some tips for choosing the right tools and getting the job done with ease:
First, consider what type of material you will be cutting; hardwoods like oak require more powerful blades than lighter woods such as pine. Ensure that your saw has enough power to handle whatever kind of wood you intend to cut. A chainsaw can make quick work of larger logs, while handsaws are better suited for smaller pieces.
Second, safety should always come first when working with any kind of power tool. Wear protective goggles and gloves when using a hand saw or chain saw, and never operate them without reading through the instructions beforehand. Make sure that you have cleared away any debris or rocks before starting so that nothing gets caught up in the blade during use.
Finally, practice the good technique by keeping your back straight and legs bent at a 90-degree angle when operating either type of saw – this keeps you safe and improves accuracy for cleaner cuts every time. With these simple steps, you’ll be ready to start chopping wood for winter!
Safety And Protective Gear
Now that you’ve chosen the right tool for the job, it’s important to make sure you’re taking all necessary safety precautions. Working with power tools can be dangerous if proper protective gear isn’t worn and caution is not taken. To ensure a safe woodcutting experience, here are some essential tips on protecting yourself while using either type of saw:
First, always wear protective goggles when operating any kind of saw – even small pieces of debris kicked up by your blade can cause serious eye injuries. Additionally, thick work gloves should be worn at all times to protect your hands from splinters or blisters. Ear protection is also recommended when using chainsaws, as they create high levels of noise pollution.
Second, keep your body in an upright position while working so that you maintain full control over the saw at all times. Keep both feet firmly planted on the ground and try to avoid any jerky movements which could throw off your balance or put undue strain on your muscles. Lastly, never use a chainsaw without wearing long pants and closed-toed shoes; loose clothing presents more risk for snagging in a moving chain.
By following these simple steps, you’ll have peace of mind knowing that you’re doing everything possible to stay safe during winter woodcutting projects!
Selecting The Right Type Of Wood
Before you can begin cutting wood for winter, it’s important to choose the right type of wood. Hardwoods such as oak, maple and ash are preferred due to their strength and durability in cold temperatures. Softwood like pine or spruce may be cheaper and easier to cut but won’t last as long when exposed to extreme cold weather conditions.
When selecting a type of wood, look for quality over quantity; opt for pieces that have minimal knots, splits and warping. Avoid using any green (freshly felled) logs, as they are still full of moisture which can cause cracking and splitting when heated indoors. It is also essential to check if your chosen piece is infected with pests such as termites or beetles before bringing it inside – these critters can quickly spread throughout your home!
Finally, inspect each piece closely before cutting it down into smaller sections. Make sure all cuts are precise so that they will fit properly together when constructing furniture or other projects during the colder months. A little extra time spent now will go a long way towards ensuring success later on!
Measuring And Marking The Wood
Now that you’ve chosen the right type of wood, it’s time to measure and mark your pieces. To ensure accuracy, use a measuring tape and make sure all measurements are exact – this will help prevent any issues when trying to fit them together later on. Mark each piece with a pencil or marker so that they can be easily identified once cut.
Before cutting, consider how much waste there might be around each piece – if possible, try to minimize the amount of scrap material left over by making strategic cuts in certain areas. This will save you money in the long run as well as reduce trips to the lumberyard for more logs!
Cutting down larger logs into smaller sections is an important part of preparing wood for winter projects. Make sure you have the proper safety equipment, including eye protection and gloves, before beginning this task. Using a saw designed specifically for cutting wood is essential; power tools such as chainsaws should only be used by experienced individuals who understand how to operate them safely.
Preparing The Area For Cutting
Before you begin cutting, it’s important to prepare the area. First, ensure that your workspace is free from any distractions or hazards, such as pets and children. Make sure all power tools are unplugged when not in use for safety purposes. Secondly, create a plan of attack – decide which pieces should be cut first and make sure there is enough room around them for easy maneuvering with the saws. Finally, wear protective gear such as gloves, goggles and long-sleeved shirts to protect yourself from flying debris while working. With these steps taken care of ahead of time, you can focus on making precise cuts without having to worry about extra precautions during the process.
Understanding The Cut Direction
When operating saws, always be sure you are making cuts in the correct direction so that your pieces fit together seamlessly when assembled.
The first thing to consider is whether or not the saw needs to make vertical or horizontal cuts. Vertical cuts usually refer to those made along the length of wood, while horizontal cuts refer to those made across its width. Additionally, pay attention to which way the blade should be rotating; most blades rotate counterclockwise, and this will depend on what type of saw you’re using. For example, table saws have blades that rotate towards their operator, while circular saws typically have their blades rotating away from them.
It’s also important to note that different types of wood require different cutting techniques as some woods are softer than others and can splinter if handled roughly with a powerful tool like an electric saw. To avoid any damages or injuries, take extra precautions when dealing with these materials by opting for hand tools such as jigsaws instead of power tools whenever possible.
Storage Tips
Having invested the time and effort into cutting wood correctly, it’s important to maintain that hard work by properly storing it. There are a few steps you can take to make sure the wood stays in good condition until winter arrives.
Firstly, choose an area with moderate temperatures and low humidity levels – basements or garages are ideal for this purpose. It’s also best to keep the wood off of the floor since moisture is more likely to collect there; instead, elevate it on pallets or shelves so air can circulate freely around each piece. Finally, cover them with plastic sheeting or tarpaulins after they’ve been sealed, as this will help protect against any dust particles from settling on top.
Summary
It’s no secret that cutting wood correctly and storing it properly are essential to making sure your firewood is ready for winter. With the right techniques, you can ensure your wood stays in good condition until those cold months arrive.
Studies have shown that up to 40% of stored logs will be lost if not treated with proper care – a statistic that should encourage anyone to consider stocking up on firewood this season! To avoid wasting any precious fuel, take steps such as keeping it off the ground and away from moisture; cover each piece with tarpaulins or plastic sheeting after they’ve been sealed; and store them in an area with moderate temperatures and low humidity levels. Doing so will help preserve their quality until you need them during the colder months.
These tips have hopefully given you some insight into how to properly cut and store your own firewood for winter use. As long as you follow these instructions carefully, you’ll be able to enjoy cozy fires all winter long without having to worry about damage or deterioration!